

Laminate is present in our day-to-day lives and is applied on a suitable substrate using adhesive(<3mm) or is self supporting as compact sheets(>3mm). Like Wood, a High Pressure Decorative Laminate it is composed of cellulose fibre and its dimensions changes with increase or decrease in humidity and temperature. When the humidity changes, the width of the laminate changes twice than the length i.e. by a ratio of approximately 2:1. In brief, as the humidity decreases, the laminate sheet contracts and when the humidity increases, the laminate sheet expands.
In general decorative laminate are pasted onto a substrate like plywood,MDF,particleboard using PVAc ,contact adhesive etc. Decorative laminates(non exterior grade) are not recommended for application to direct sunlight or exterior use.
Decorative laminates should be stored so they are protected from moisture, humidity and direct sunlight. The sheets should be placed flat on a suitable horizontal surface (e.g. on a pallet with a backing plate).
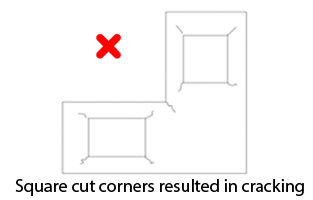
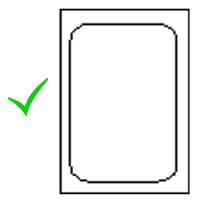
All corner cutouts and inner cutouts on composite panels and compact sheets should be rounded and not right angled to each other. If cutouts are made in right angle then there is a major possibility to get cracks at the corner. So to get inner cuts rounded first make a hole using a drilling machine on the corners and then cut the further.
Cutting must be performed with the laminate decorative side down to avoid chipping on the visible edge. . A clean base (e.g. felt base) should be used to protect the visible decorative side from scratching.
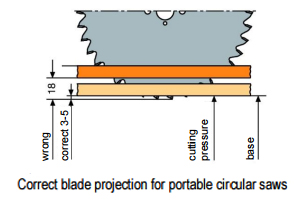
Laminates should be cut with a sharp, fine toothed saw held at a low angle.It should cut into the decorative face.
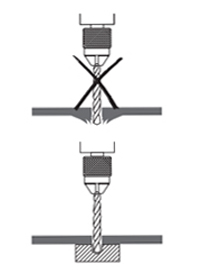
Spiral drills When drilling decorative laminates, special drill bits are recommended. The recommend tools are spiral drills with a point angle of 60° to 80° (compared to the 120° point angle typically used to drill metals).
Decorative laminates and substrates should be conditioned simultaneously before processing in order to obtain similar moisture content for both materials. Optimum conditions are approximately 75°F (24°C) and a relative humidity of 45% to 55%. Substrate should not be too wet or too dry before installing. Put decorative laminates and substrates for at least three days in the same environment as they will subsequently be bonded. If the finished composite component will be exposed to continuous low relative humidity during future use, it is recommended that the decorative laminate and substrate be conditioned at a correspondingly low humidity before sticking laminate to substrate in order to reduce shrinkage stress.
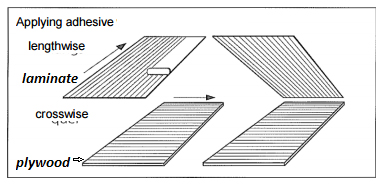
The adhesive should be spread evenly across the surface. For composite panels the amount of adhesive applied must be the same on both sides in order to prevent warping. This is particularly important for water-based adhesive systems where the amount of adhesive applied should be as small as possible.Apply adhesive(glue) on laminate and substrate at right angle to each other
A Variety of adhesive have been found satisfactory for bonding decorative to core materials. The choice of adhesive is based upon the service for which the assembly is intended and upon the bonding facilities available.
| Fevicol SH* or Equivalent *Synthetic resin adhesive water based white glue. | Fevicol speedx* or Equivalent *Synthetic resin adhesive | Fevicol SR 998* or Equivalent *Synthetic rubber based adhesive contains solvent | Fevicol SRXPRESS* or Equivalent *Synthetic rubber based adhesive contains solvent | |
|---|---|---|---|---|
| Surface | Should be properly leveled | Should be properly leveled | Should be properly leveled | Should be properly leveled |
| Coating | Should be on both the surfaces | Should be on both the surfaces | Should be on both the surfaces | Should be on both the surfaces |
| Humidity | Should be used in normal humidity | Normal humidity | Can be used in higher humidity | Can be used in higher humidity |
| Humidity more than 80% | Should not be used | Should not be used | Can be used | Can be used |
| Pressure used | Under Pressure | Under Pressure | Under Pressure | Under Pressure |
| 6 – 8 Hours | 2 Hours | 30 Minutes | 20 Minutes |
Polyvinyl acetate (PVA) emulsion adhesives may be used for bonding laminates to wood substrates where resistance to moisture and high heat are not required in the application (e.g. furniture, kitchen cabinets, and office partitions). They are generally not suitable for sink tops. They are room temperature setting adhesives, requiring only that the water in the emulsion be absorbed by the components. There are catalyzed PVA’s which are cured at high temperatures with improved performance.
Contact adhesives may be used for bonding laminates to a variety of cores. They are particularly useful for application to metal or other impervious surfaces. There are two primary types - solvent based and water based (water based adhesives are not suitable for bonding laminates to steel of iron surfaces.) The solvent or the water should be evaporated before satisfactory bonding can be accomplished. Contact adhesives do not restrict the movement of the laminate caused by varying humidity conditions to the same extent as thermosetting adhesives. This characteristic should be kept in mind when selecting the adhesive for the application.
Urea-formaldehyde adhesives are satisfactory for most applications. They can be used for room temperature bonding of for “hot” bonding. Hot bonding may tend to increase panel warpage and a backer lamiate should be used to control warpage. When hot bonding, the temperature should not exceed 140° F for best results.
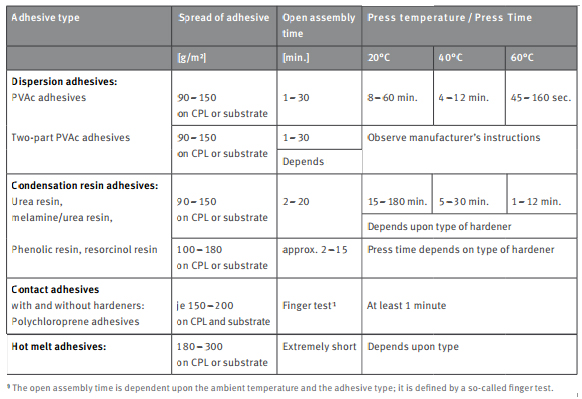
Open assembly is the period between application of the adhesive to the bonding surfaces and the time when the pieces must be bonded.
In case of highly porous surface like particle board it is advised that a thin coat of glue is applied on the surface with pressure and allowed to dry. After drying light sanding is to be done to level the surface. Then apply second coat for bonding the material. This will avoid bonding failure.
After applying contact adhesive,when ready, will exhibit a uniform semi-gloss appearance over the entire surface of the material to be bonded. Marked variation in appearance will generally indicate an improper or non-uniform adhesive spread.
Always ensure that the adhesive is spread onto the substrate in one direction and onto the back of the laminate in the other direction , for example along the length of the substrate and across the width of the laminate, this will give a cross linking effect when the two surfaces are joined together.
Do not stick laminate and substrate when the relative humidity is high (above 80 percent at temperatures of 21 deg. C (70 deg. F) ) as moisture may condense on the surface during drying (known as "blushing") and will prevent an acceptable bond.
Laminate should not be bonded on high moisture or wet wooden substrate as they tend to shrink on passage of time leading to cracks or warpage.
STRESS CRACKING: In conditions of low humidity caused by central heating, or of localised heating by radiator grilles or hot air vents, shrinkage may occur which can result in cracks from high stress points such as sharp internal corners or chipped edges.Stress cracking is the result of stresses set up when the dimensional movements of the laminate and of the substrate to which it is bonded, are different in either rate or direction.. Stress cracking most often occurs when contact adhesive is used.
Precondition laminate and substrate for a minimum of 48 hours prior to fabrication. Optimum conditions are approximately 75°F (24°C) and 45% to 55% relative humidity.
Adhesive bond: Contact adhesives, by their nature, are elastomeric and, therefore, transfer less of the stress to the substrate. Assemblies made with contact adhesives, therefore, are less crack resistant than those fabricated with rigid or semi-rigid adhesives. If contact adhesives are used, they should be properly applied and fused to obtain the strongest possible bond.
Rigid and semi-rigid adhesives such as resorcinol, ureas and PVAc (white glue) transfer stresses directly to the substrate. Assemblies fabricated with these adhesives are more crack resistant.
The stress crack performance of assemblies using contact adhesive can be greatly improved if a PVAc (white glue) is used at all inside corners. Note: If the assembly is to be water resistant, a catalyzed PVAc glue should be used.
The cutout area of the laminate and substrate assembly is masked prior to applying the contact adhesive.
Once the contact adhesive has been applied and dried, the masking is removed and a PVAc glue is applied.
The laminate and substrate are then joined and nip rolled together to fuse the contact adhesive. The masked-off area is then clamped until the adhesive sets. This usually takes about one hour.
The inside corners of all cutouts must be radiused as large as possible (1/8" (3.18mm) minimum) to minimize stress cracking.
In order to minimise dimensional movement, the longest dimension of the panel should be cut in the length direction of the laminate sheet, i.e. parallel with the sanding lines; as laminate movement is approximately twice as great across the sheet width as it is along the length.
Bubbling: The adhesive bond failure, commonly known as bubbling. This may occur in conditions of high humidity or wetting if there are weak areas of adhesive bond (usually associated with hand-applied contact adhesives).
If the laminate has been bonded in normal dry conditions using contact adhesive, and the panel is subsequently subjected to high levels of humidity, the laminate will expand. The amount of creep will depend on the panel dimensions (the larger the panel the greater the movement), and if there is a weakness in the bond the laminate may lift from the substrate.
Apply the adhesive on laminate and substrate in cross sectional direction to each other as shown in the figure before.
Level the surface of plywood using the sand paper before applying the adhesive. As a consequence of small pockets of air trapped under the laminate surface, this air warms up it has no where to go and the pressure breaks the bond and forces a bubble onto the surface.
Warpage: Difference in the dimenstional movement of the laminate and substrate(plywood,MDF) when the relative humidity changes causes warping. The use of laminates and substrates that have different strengths and/or dimensional movement potentials is not the only cause of warpage. Exposing one side of a panel assembly to different humidity conditions than the other side can also cause warpage.
The same laminate or skin should be applied on both sides(in case non compact laminate). Less critical applications may only require a cabinet liner.
Thick panels warp less than thin panels due to increased rigidity and the geometry of the forces involved.
Laminates expand and contract twice as much in their cross- grain direction as they do in their grain (parallel with the sanding lines) direction. Always align the sanding lines of the front and back laminates in the same direction and align the sanding direction of the laminate with the longest panel dimension. It is also advisable to align the grain and cross-grain directions of the laminates with that of the substrate.
(imp for compact laminate)In order to minimise dimensional movement, the longest dimension of the panel should be cut in the length direction of the laminate sheet, i.e. parallel with the sanding lines; as laminate movement is approximately twice as great across the sheet width as it is along the length.

+(91)-8929700055

info@ideallaminates.com

www.ideallaminates.com